No products in the cart.
Appscript
Sync Google Sheets to Supabase Tutorial

11
Jul
Jul
Introduction
Ready to level up your data management game? Learn how to synchronize data effortlessly from a Google Sheets document to a Supabase database using Google Apps Script. Whether you’re looking to streamline data entry or enhance scalability, this tutorial has got you covered. Join us now and unlock the power of Google Sheets as a user-friendly interface while storing your data securely in Supabase. Let’s revolutionize your data management workflow together!
Prerequisites
Before we start, you will need:
- A Google account with access to Google Sheets and Google Apps Script.
- A Supabase account with a database set up.
Step 1: Set up your Google Sheets document
- Create a new Google Sheets document.
- In the first row, enter the names of the columns that you want to sync with your Supabase database. For example, if you have a “users” table in your database with columns “id”, “name”, and “email”, you would enter “ID”, “Name”, and “Email” in the first row of your Google Sheets document.
- Enter some data in the following rows for testing purposes.
Step 2: Set up your Supabase database
- Log in to your Supabase account and navigate to the database section.
- Create a new table that matches the structure of your Google Sheets document. In our example, we would create a “users” table with “id”, “name”, and “email” columns. Make sure the data types of the columns match the type of data you will be entering in your Google Sheets document.
- Note down the URL of your Supabase project and the anon key, which you will need later to connect to the database from Google Apps Script.

Step 3: Write the Google Apps Script
- In your Google Sheets document, click on “Extensions” > “Apps Script”.
- Delete any code in the script editor and replace it with the following code:
javascript
// This function is triggered whenever a cell is edited.

function onEdit(e) {

var range = e.range;

var sheet = range.getSheet();
// Check if the edited sheet is the one we're interested in
if (sheet.getName() === "Sheet1") { // Replace "Sheet1" with the name of your sheet
var row = range.getRow(); // Check if the edited row is not the header row
if (row > 1) {
// Add a "changed" flag to the edited row
sheet.getRange(row, sheet.getLastColumn() + 1).setValue("changed");
}
}
}
// This function sends updates to the Supabase database and is meant to be run periodically.
function sendUpdates() {
var sheet = SpreadsheetApp.getActiveSpreadsheet().getSheetByName("Sheet1"); // Replace "Sheet1" with the name of your sheet
var data = sheet.getDataRange().getValues();
// Assuming the first row contains headers
var headers = data[0];
var idIndex = headers.indexOf("ID"); // Replace "ID" with the name of your primary key column
for (var i = 1; i < data.length; i++) {
var row = data[i];
// Check if this row has been marked as changed
if (row[row.length - 1] === "changed") {
var id = row[idIndex];
var payload = {};
for (var j = 0; j < row.length - 1; j++) {
if (j !== idIndex) {
payload[headers[j]] = row[j];
}
}
var url = "https://your-supabase-url/rest/v1/your-table-name"; // Replace with your Supabase URL and table name
var options = {
headers: {
apikey: "your-anon-key", // Replace with your Supabase anon key
Authorization: "Bearer your-anon-key", // Replace with your Supabase anon key
"Content-Type": "application/json",
},
payload: JSON.stringify(payload),
muteHttpExceptions: true,
};
if (id) {
// If the row has an id, it already exists, so we should update it
url += "?id=eq." + id;
options.method = "patch";
} else {
// If the row doesn't have an id, it's new, so we should create it
options.method = "post";
}
var response = UrlFetchApp.fetch(url, options);
// Remove the "changed" flag
sheet.getRange(i + 1, sheet.getLastColumn()).clearContent();
}
}
}
- Replace “Sheet1” with the name of your Google Sheets document, “ID” with the name of your primary key column, “https://your-supabase-url/rest/v1/your-table-name” with your Supabase URL and table name, and “your-anon-key” with your Supabase anon key.
- Click on “File” > “Save” to save the script.
Step 4: Test the synchronization
- Go back to your Google Sheets document and edit a cell in one of the rows. You should see “changed” appear in the last column of the edited row.
- Run the
sendUpdatesfunction in the Apps Script editor by clicking on the play button. Youshould see the “changed” flag disappear from the edited row. - Check your Supabase database. You should see that the corresponding row in the database has been updated with the changes you made in the Google Sheets document.
Step 5: Automate the synchronization
- In the Apps Script editor, click on “Edit” > “Current project’s triggers”.
- Click on “+ Add Trigger” in the bottom right corner.
- Select the
sendUpdatesfunction, set the event type to “Time-driven”, and choose how often you want the function to run (for example, every 5 minutes). - Click on “Save”.
Now, the sendUpdates function will run automatically at the interval you specified, and any changes you make in your Google Sheets document will be automatically synced to your Supabase database.
Conclusion
Congratulations! You have successfully set up a system to synchronize data from a Google Sheets document to a Supabase database. This can be a powerful tool for managing and storing data, especially when combined with the user-friendly interface of Google Sheets and the scalability and robustness of Supabase.
Remember to always keep your Supabase anon key secure, as it can be used to access and modify your database. If you need to share your Google Apps Script code, make sure to remove or replace the key first.
If you run into any issues or have any questions, don’t hesitate to ask for help. Happy coding!
Supabase Credentials and Authentication

Getting Supabase Credentials
- After you’ve created your Supabase account and set up a project, navigate to the “Settings” tab in the Supabase dashboard.
- Under the “API” section, you’ll find your Supabase URL and API keys. The URL is the base URL for all your API requests. The API keys are used to authenticate your requests.
- There are two types of API keys:
anonandservice_role. Theanonkey is used for requests that don’t require specific user permissions, while theservice_rolekey bypasses all permissions and can perform any action. Fdor security reasons, you should use theanonkey whenever possible and keep yourservice_rolekey secret.
Authentication and JWT
JWT (JSON Web Tokens) is an open standard for securely transmitting information between parties as a JSON object. In the context of Supabase, JWTs are used for authenticating users.
When a user logs in or signs up, Supabase’s Auth API returns a JWT. This token can then be included in the Authorization header of subsequent API requests to authenticate the user.
Here’s an example of how to log in a user and get a JWT with Supabase’s JavaScript client:
javascript
const { user, session, error } = await supabase.auth.signIn({

email: 'user@example.com',

password: 'password',

})
if (error) {
console.error('Error logging in:', error)
} else {
console.log('User logged in:', user)
console.log('JWT:', session.access_token)
}In this example, session.access_token is the JWT. It can be included in the Authorization header of API requests like this: Authorization: Bearer <JWT>.
Using JWT in Google Apps Script
In Google Apps Script, you can include the JWT in the Authorization header of your API requests like this:
javascript
var options = {

headers: {

Authorization: 'Bearer ' + jwt,

// Other headers...

},

// Other options...

}
Remember to replace jwt with your actual JWT.
Please note that this is a basic example. In a real-world application, you would need to handle user sessions, token refreshes, and other aspects of authentication. Supabase’s Auth API and JavaScript client provide built-in methods for these tasks.
How to use rls (row level security) in Supabase
Row Level Security (RLS) is a feature in PostgreSQL that allows you to control which users can SELECT, INSERT, UPDATE, or DELETE data based on various factors. When RLS is enabled on a table, the system will automatically append a WHERE clause to any query run against that table, ensuring that only rows for which the policy’s USING expression evaluates to true are visible.
Here’s how you can use RLS in Supabase:
1. **Enable RLS**: In the Supabase dashboard, navigate to the “Table Editor” and select the table you want to secure. Click on the “Security” tab and toggle on “Enable Row Level Security”.
2. **Create Policies**: Policies are the rules that determine who can access what data. You can create a policy by clicking on the “New Policy” button. Each policy has a name, a check expression (which rows this policy applies to), and a role (which user roles this policy applies to).
For example, you might create a policy named “users_can_view_their_own_data” with the check expression `auth.uid() = user_id` and the role `authenticated`. This policy would allow authenticated users to view rows where the `user_id` column matches their own user ID.
3. **Test Your Policies**: You can test your policies by running queries as different user roles. In the “SQL Editor”, click on the “Role” dropdown and select a role. Then, run a query against your table and see what data is returned.
Remember, RLS policies are applied in addition to any permissions set in your API keys. If a user role doesn’t have permission to access a table, they won’t be able to access it even if a policy allows it.
Also, be aware that enabling RLS on a table without adding any policies will make the table inaccessible to all roles, because the default behavior is to deny all access.
Finally, note that RLS policies are written in SQL and can include any SQL expressions, so they can be as simple or as complex as you need. You can use functions like `auth.uid()` and `auth.role()` to access information about the current user, and you can reference any column in the table in your expressions.
How can I use rls with the appscripts?
To use Row Level Security (RLS) with the App Script we made, you would need to adjust the way you authenticate with the Supabase API. Currently, the script is using the anon key, which means all requests are made as an anonymous user. To take advantage of RLS, you would need to authenticate as a specific user.
Unfortunately, as of my knowledge cutoff in September 2021, Google Apps Script does not support JWT authentication out of the box, which is what Supabase uses for user authentication. You would need to use a service that can generate JWT tokens, or use a library that can generate them, and then include the JWT token in the `Authorization` header of your requests.
Here’s a general idea of what the process would look like:
1. **User Authentication**: Authenticate your user with Supabase and obtain a JWT token. This could be done in a separate application, or potentially within the Apps Script itself if you can find a way to generate JWT tokens.
2. **Include JWT in Requests**: Include the JWT token in the `Authorization` header of your requests. The header should look like this: `Authorization: Bearer YOUR_JWT_TOKEN`.
3. **Adjust RLS Policies**: Adjust your RLS policies in Supabase to account for the user roles that will be making requests. For example, you might create a policy that allows the `authenticated` role to view rows where the `user_id` column matches their own user ID.
Please note that this is a high-level overview and the specific implementation could be quite complex, depending on your exact requirements and the capabilities of Google Apps Script. It’s also possible that there have been updates or changes to these platforms since my last training data in September 2021, so I would recommend checking the latest documentation for both Google Apps Script and Supabase.
Can we still access the database with anon key if rls is turned on?
Yes, you can still access the database with the anon key even if Row-Level Security (RLS) is turned on. However, the access will be subject to the policies you’ve set up for the anon role.
When you enable RLS on a table in Supabase (or in PostgreSQL, more generally), you’re telling the database to restrict access to rows based on certain conditions. These conditions are defined in policies, and each policy can be set to apply to a specific role or to all roles.
If you have a policy that applies to the anon role, then that policy will be used to determine what rows can be accessed when using the anon key. If there are no policies for the anon role, or if the conditions in those policies are not met, then the anon key will not be able to access any rows in the table.
So, while you can technically still “access” the database with the anon key (in the sense that you can still make requests), whether or not you can actually read, update, or delete data will depend on the policies you’ve set up.
What if I have no policies for anon key?
If you have no policies set for the `anon` role and Row-Level Security (RLS) is enabled, then the `anon` role will not be able to perform any operations (select, insert, update, delete) on the table. This is because RLS restricts all operations by default, and only allows operations that are explicitly permitted by a policy.
In other words, when RLS is enabled, the table is locked down completely, and you must define policies to grant access to specific roles. If no policies are defined for a role, that role has no access.
So, if you want the `anon` role to be able to perform certain operations, you would need to create policies that allow those operations. For example, you might create a policy that allows the `anon` role to select (read) all rows in a table, but not update, delete, or insert.
Remember that the `anon` key should be used for operations that are safe for anyone to perform since it’s not tied to a specific user and doesn’t require authentication. Any operations that require user-specific permissions or authentication should be performed with a user-specific JWT (JSON Web Token), not the `anon` key.
How can I create a role key for my appscript and define full policies for it?
To create a new role and define full policies for it in Supabase, you will need to use SQL commands. Here’s a step-by-step guide:
1. **Create a new role**: You can create a new role in Supabase by running the following SQL command in the SQL editor in the Supabase dashboard:
```sql CREATE ROLE appscript; ``` This command creates a new role named `appscript`.
2. **Generate a JWT for the new role**: You will need to generate a JWT for the new role. This can be done programmatically using a library like `jsonwebtoken` in Node.js, or using an online tool. The JWT should include the `role` claim set to `appscript`. The JWT will need to be signed with the same secret key that Supabase uses to sign its JWTs. You can find this key in the Settings > API section of the Supabase dashboard.
3. **Set policies for the new role**: You can set policies for the new role by running SQL commands in the SQL editor in the Supabase dashboard. For example, to allow the `appscript` role to perform all operations on a table named `mytable`, you could run the following commands:
```sql CREATE POLICY appscript_select ON mytable FOR SELECT TO appscript; CREATE POLICY appscript_insert ON mytable FOR INSERT TO appscript; CREATE POLICY appscript_update ON mytable FOR UPDATE TO appscript; CREATE POLICY appscript_delete ON mytable FOR DELETE TO appscript; ``` These commands create policies that allow the `appscript` role to select (read), insert (create), update, and delete rows in `mytable`.
4. **Use the JWT in your App Script**: Finally, you can use the JWT you generated in step 2 in your App Script. Replace the `anon` key in the `Authorization` header with `Bearer <your_JWT>`. This will authenticate your requests as the `appscript` role, and the policies you set in step 3 will apply.
Please note that managing roles and policies can have significant security implications, so it’s important to understand what each command does and to test your setup thoroughly. Also, keep your JWT and secret key secure to prevent unauthorized access to your database.
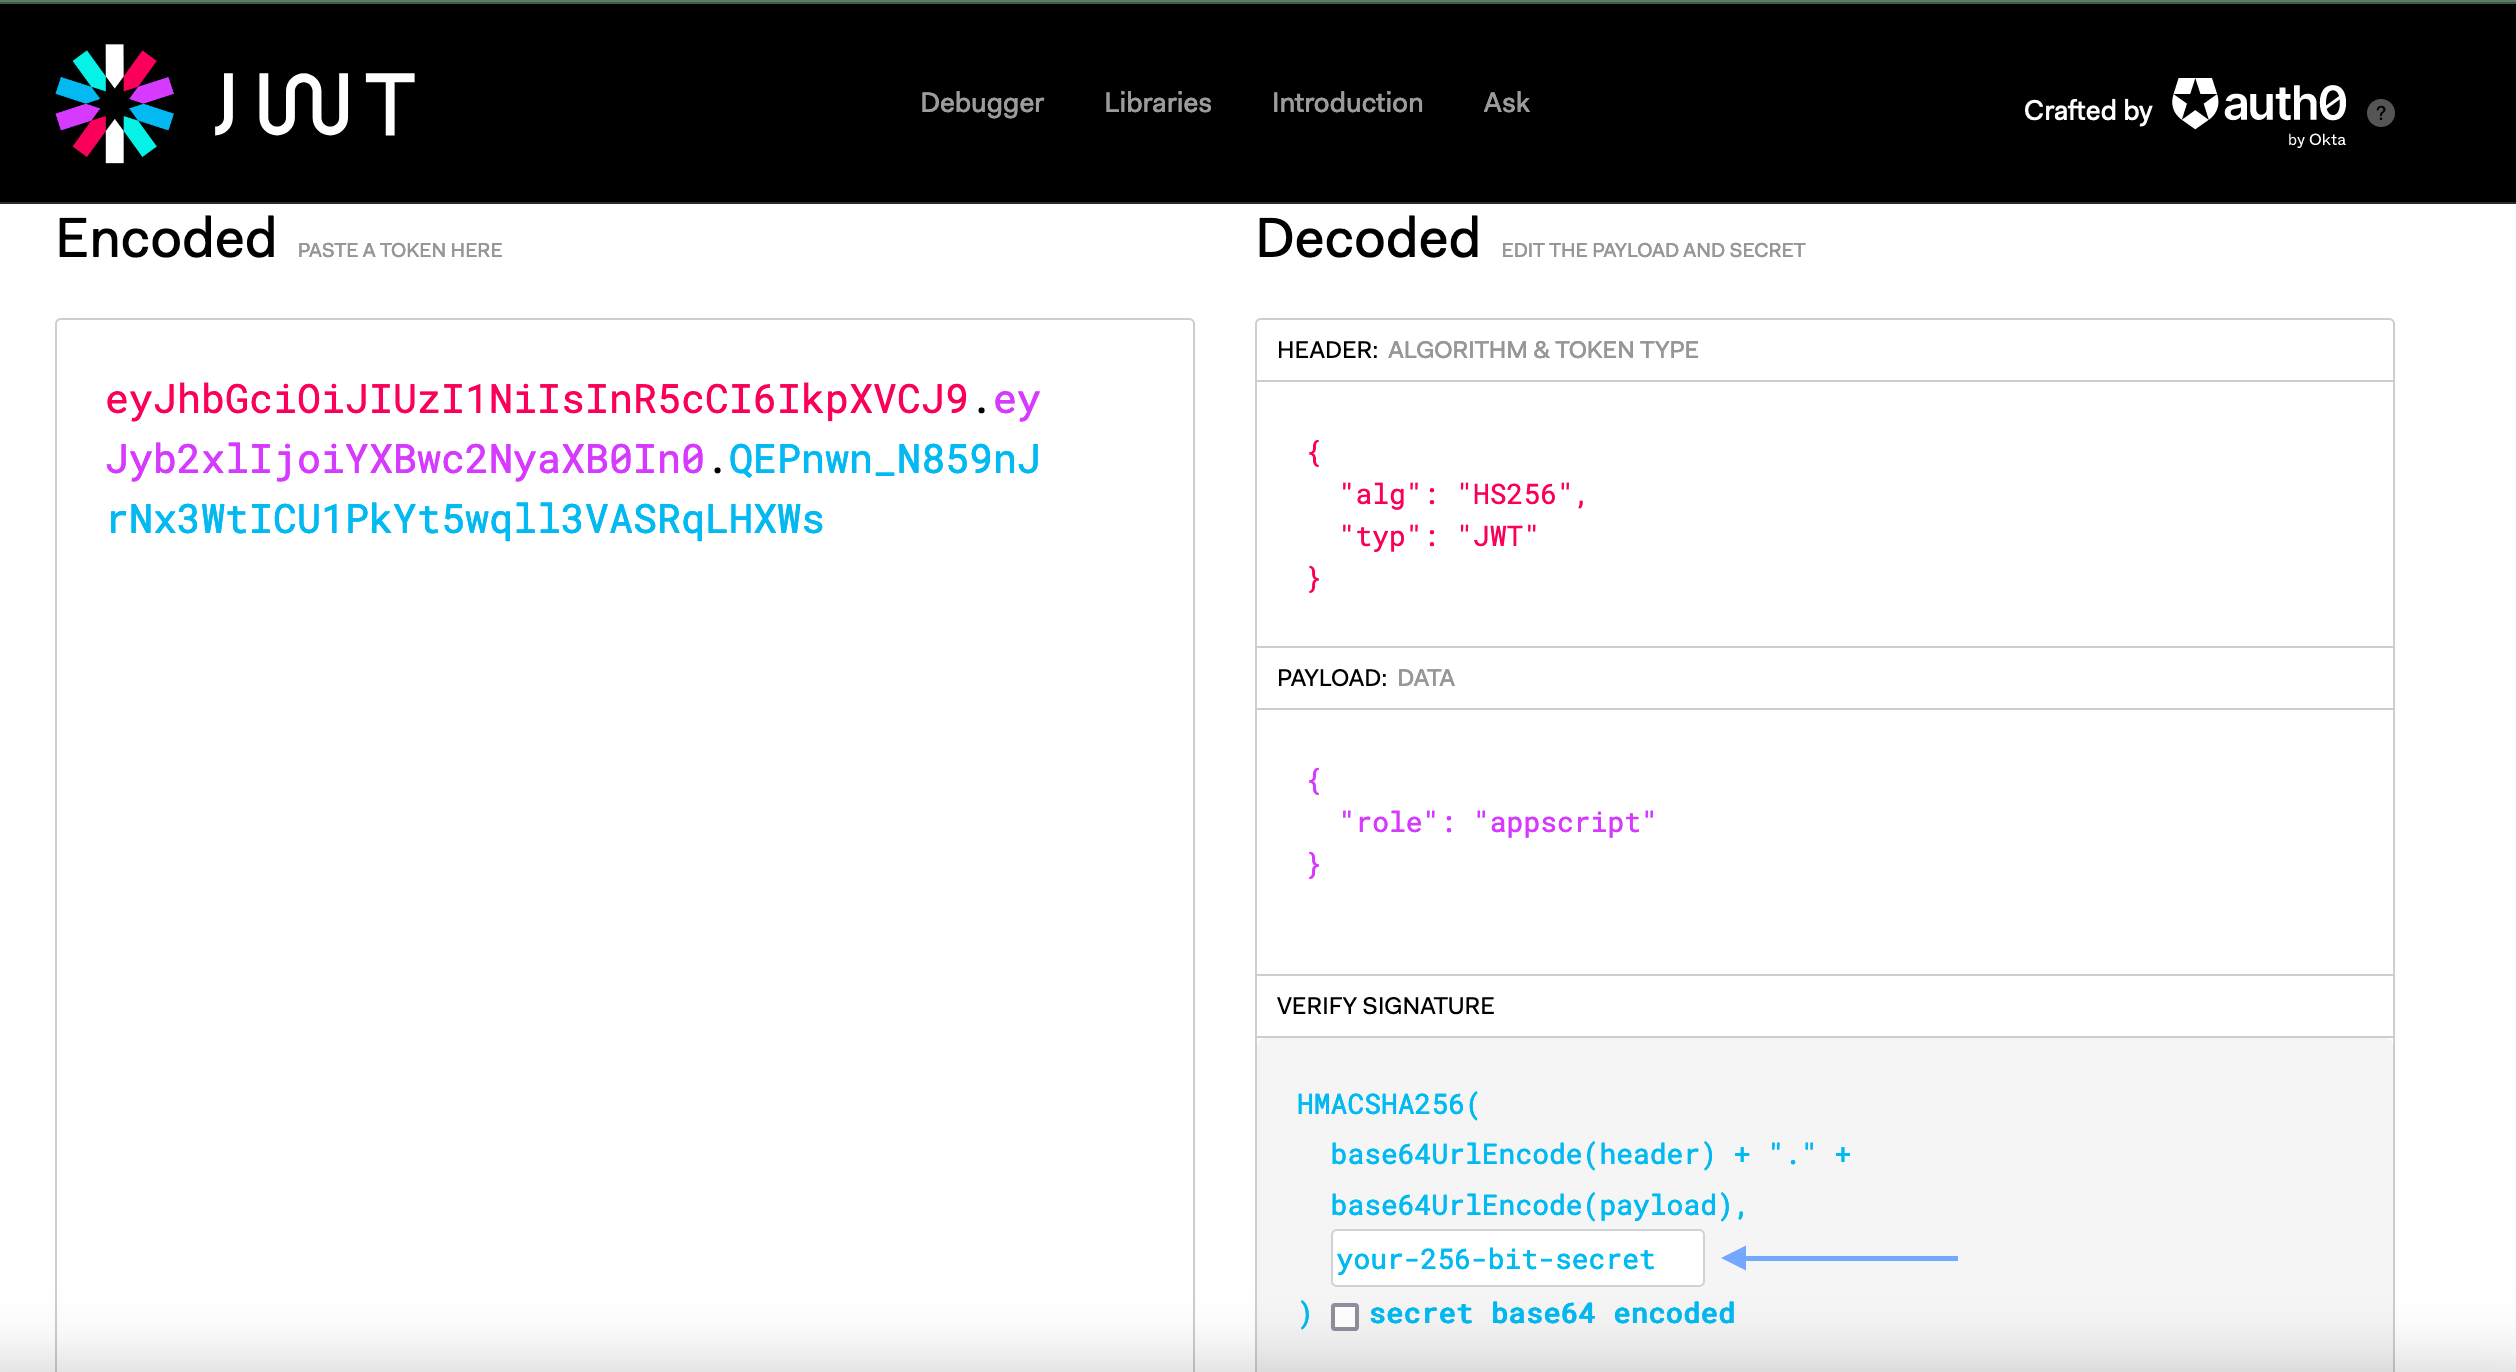
How can I generate the JWT with an online tool?
To generate a JWT (JSON Web Token) with an online tool, you can use a website like jwt.io or similar. Here’s a step-by-step guide on how to do it:
1. **Go to jwt.io**: Open your web browser and navigate to [jwt.io](https://jwt.io/).
2. **Enter your payload**: In the “Payload” section of the page, you’ll see a default payload already filled in. You can replace this with your own payload. For example, if you’re creating a JWT for a role named `appscript`, your payload might look like this:
```json { "role": "appscript" } ``` This payload specifies that the role of the user is `appscript`.
3. **Enter your secret**: In the “Verify Signature” section of the page, you’ll see a field labeled “your-256-bit-secret”. Replace this with the secret key that Supabase uses to sign its JWTs. You can find this key in the Settings > API section of the Supabase dashboard.
4. **Copy your JWT**: After you’ve entered your payload and secret, the website will generate a JWT for you. This JWT will be displayed in the “Encoded” section of the page. You can copy this JWT and use it in your App Script.
Remember to keep your JWT and secret key secure. Anyone who has these can impersonate your role and potentially gain unauthorized access to your database.
Also, note that the JWT you generate with this method will not have an expiration time. If you want your JWT to expire after a certain amount of time, you can add an `exp` claim to your payload with a Unix timestamp of when you want the JWT to expire. For example:
```json{ "role": "appscript", "exp": 1672444800}```This payload specifies that the JWT should expire at the Unix timestamp `1672444800`, which corresponds to January 1, 2023.
Do I need to copy my JWT to supabase?
No, you don’t need to copy your JWT to Supabase.
JWTs are used for authentication and are typically sent from the client (in this case, your App Script) to the server (Supabase). When your App Script makes a request to Supabase, it should include the JWT in the `Authorization` header of the request. Supabase will then verify the JWT, check the role specified in the JWT, and apply the corresponding policies.
Here’s an example of how you might include the JWT in your App Script:
```javascriptvar options = { headers: { Authorization: "Bearer YOUR_JWT_HERE", // other headers... }, // other options...};```Replace `YOUR_JWT_HERE` with the JWT you generated. When Supabase receives a request with this JWT, it will know that the request is coming from a user with the `appscript` role (or whatever role you specified in your JWT), and it will apply the policies you’ve defined for that role.
Remember to keep your JWT secure. Anyone who has your JWT can make requests to Supabase as if they were your App Script.
Is the JWT like a hash that contains the role and secret key from supabase?
Yes, a JSON Web Token (JWT) is a compact, URL-safe means of representing claims to be transferred between two parties. The claims in a JWT are encoded as a JSON object that is used as the payload of a JSON Web Signature (JWS) structure or as the plaintext of a JSON Web Encryption (JWE) structure, enabling the claims to be digitally signed or integrity protected with a Message Authentication Code (MAC) and/or encrypted.
In the context of Supabase, the JWT contains claims about the authenticated user, such as their role. The JWT is signed using a secret key that only Supabase knows, which allows Supabase to verify that the JWT is legitimate and hasn’t been tampered with.
Here’s an example of what a JWT might look like:
“`
eyJhbGciOiJIUzI1NiIsInR5cCI6IkpXVCJ9.eyJyb2xlIjoiYXBwc2NyaXB0IiwiaWF0IjoxNjI2MzI5MDIyLCJleHAiOjE2MjYzMzI2MjJ9.5GzQa2Fj3T2anFKCuV1kH6kZHFrannUbL8a8VfsZxWg
“`
This JWT is divided into three parts, separated by dots:
1. The header (`eyJhbGciOiJIUzI1NiIsInR5cCI6IkpXVCJ9`), which specifies the algorithm used to sign the JWT.
2. The payload (`eyJyb2xlIjoiYXBwc2NyaXB0IiwiaWF0IjoxNjI2MzI5MDIyLCJleHAiOjE2MjYzMzI2MjJ9`), which contains the claims.
3. The signature (`5GzQa2Fj3T2anFKCuV1kH6kZHFrannUbL8a8VfsZxWg`), which is used to verify that the JWT hasn’t been tampered with.
The header and payload are Base64Url encoded JSON strings. If you decode the payload of the above JWT, you’ll get a JSON object like this:
```json{ "role": "appscript", "iat": 1626329022, "exp": 1626332622}“`
This indicates that the role of the authenticated user is `appscript`, and it also includes the issued at (`iat`) and expiration (`exp`) timestamps.